Harddisk Spindown on TS-239 Pro II

It is possible to configure the harddisks to spin down after a period of inactivity, but if one or more processes keep reading and writing from the disks, that will prevent them from entering standby mode.
To find out which processes are causing disk activity, the following script is very useful:
blkdevMonitor.sh
The script works like this:

  • A standby signal is sent to the disk.
  • Wait until a process wakes up the disk and then prints out name of that process.
  • Repeat.

The following link contains a list of daemons and configurations known to cause random disk activity: Standby Mode FAQ
Older versions of Squeezebox Server caused lots of disk activity, but fortunately that has been resolved in version 7.5.1.
What is jdb2 and flush?
Sometimes the processes “jbd2” and “flush” are waking up the harddisk. As I understand, these processes are responsible for doing delayed writes to the disk in order to optimize performance. In other words, they are writing to the disk on behalf of other processes which makes it difficult to find the culprit(s). In my case, it was the samba daemon accessing the disk. As long as a PC or media streamer on your network has an open view on any of your samba shares, it will cause the disks to wake up.

Formatting a USB drive from a TS-239 Pro II

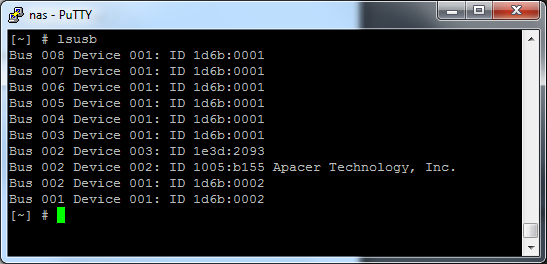
Plug the USB stick into the Qnap. Then in a terminal, as root, do an lsusb to confirm that the USB drive has been recognised.

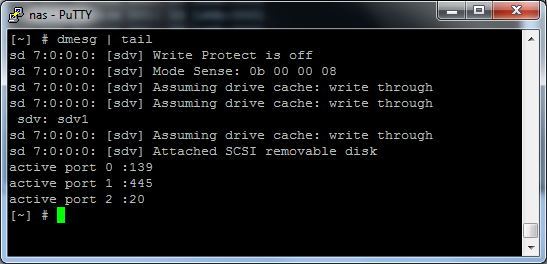
To find out what device name it has been assigned, do a dmesg | tail. This will print the latest lines from the kernel log, which should contain information about the inserted USB drive:

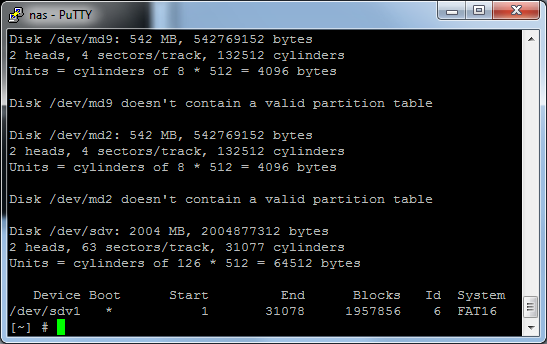
fdisk -l, which shows all connected drives, can also be used to find the right device name. The USB drive can be recognised by its size. In this case, it is a 2 GB one:
output from fdisk -l
If the USB drive is already formatted with e.g. NTFS, it has probably been mounted automatically, in which case it should be unmounted. You can check this with the df command:
df
Once we know the name of the drive and it is unmounted, we can create a new linux partition using fdisk:

  • If for example the device is sdv1, do an fdisk /dev/sdv1
  • type d to delete any existing partitions.
  • Type n to create a new partition.
  • Make it primary and first
  • Go with the defaults when prompted for start and end cylinder
  • Press t to change the filesystem to linux (number 83)
  • Type w to write the changes to the disk and exit

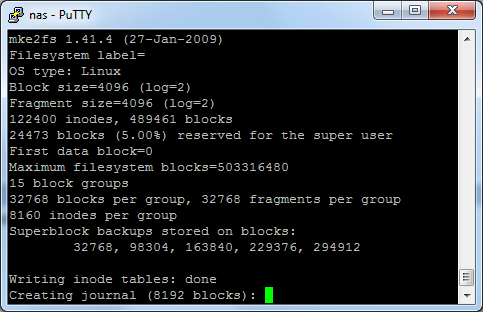
Finally, format the partition with the ext3 filesystem:
mke2fs -j /dev/sdv1

Now the partion is formatted and it can be mounted again:
mount /dev/sdv1
The USB drive is now ready for use 🙂

Starting, restarting and stopping daemons in Linux

Daemon services, or just daemons, are started at boot time. They are roughly equivalent to services in the Windows world.
To see which daemons are available on a system, do an

ls -l /etc/init.d/

Every script in that directory represents a daemon, which can be started, restarted and stopped manually using the following syntax:

/etc/init.d/<daemon name> start | restart | stop

If, for example, I wanted to restart an nzb-get daemon due to changes in its configuration files, I would type

/etc/init.d/nzb-get.sh restart

After issuing the command, the daemon will usually print some lines to the terminal indicating what it is doing, e.g.: “Starting NZB-Get Daemon” or “Shutting Down“.

If you want to make sure whether a daemon is running or not, you can grep for its name in the list of running processes. If I wanted to see if the nzb-get daemon was really started, I could do the following grep:

ps -aux | grep nzb

If the daemon is running, this will produce a result like:

8148 admin 2456 S /opt/bin/nzbget --daemon
8355 admin 564 S grep nzb

The first line is the daemon. Notice the “–daemon” at the end of the line. The second line is the grep process we just ran to find the daemon.

Subversion on QNAP TS-239 Pro II

Based on the guide on the QNap wiki. This guide specifically shows how to install a subversion server on port 4000 for multiple repositories on the QNAP TS-239 Pro II.

  • Install svnserve:

    # ipkg update
    # ipkg install svn
  • Create a directory for the repositories:

    # mkdir /share/HDA_DATA/subversion
  • To create a new repository for a project, do the following:

    # svnadmin create /share/HDA_DATA/subversion/repos1

    NB: To delete a repository, just delete the directory itself.
  • Access to the repositories is set up in the repos1/conf/svnserve.conf, repos1/conf/passwd and repos1/conf/authz files. The following is a basic configuration.

svnserve.conf:
[general]
anon-access = read
auth-access = write
password-db = passwd

passwd:

[users]
svnuser= svnusersecret

authz:

[repository:/share/HDA_DATA/subversion/repos1]
svnuser = rw

  • To start the svnserve daemon on startup, we must add a command to autorun.sh.
    This file is located on the configuration ram block, sdx6, which must first be mounted. This is done in the following way on the TS-239 Pro II (for other models, see Running Your Own Application at Startup)

    # mount -t ext2 /dev/sdx6 /tmp/config

    Open autorun.sh in an editor:

    # nano /tmp/config/autorun.sh

    Add the following line, which will make sure svnserve is executed only when opt/bin has been loaded:

    (while test ! -x "/opt/bin/svnserve"; do sleep 5; done; /opt/bin/svnserve -d --listen-port=4000)&

    Finally, make sure autorun.sh is executable and unmount sdx6:

    # chmod +x /tmp/config/autorun.sh
    # umount /tmp/config
  • You can test the subversion server by doing a checkout using your favourite subversion client (e.g. TortoiseSVN). The url to check out will be something like this:
    svn://nas:4000/share/HDA_DATA/subversion/repos1

UPDATE 10/6 2019

After a QNap update, the Subversion server would no longer start. It appears that the “opt” dir symlink no longer points to the right place. The following fixed it.

In the autorun.sh file, just add the following instead of the above:

export LD_LIBRARY_PATH=/share/HDA_DATA/.qpkg/Optware/lib

(while test ! -x "/share/HDA_DATA/.qpkg/Optware/bin/svnserve"; do sleep 5; done; /share/HDA_DATA/.qpkg/Optware/bin/svnserve -d --listen-port=4000)&


Ampache on QNap TS-239 Pro II

  • Go to the Web Interface -> Applications -> MySQL Server -> “Enable MySQL Server” and “Enable TCP/IP Networking
  • Go to the Web Interface -> Network Services -> “Enable Web Server
  • In the “Web” directory on the QNap, create a directory called “music“.
  • Download the latest release of Ampache and extract it to this directory.
  • Open the corresponding URL in a browser (e.g. ‘http://nas/music’) and the Ampache installation page appears.
    If all requirements are met the configuration can begin.
  • Leave the default settings and enter ‘root’ in username and ‘admin’ in password, if you have not changed these.
  • This will generate a config file, which must be saved to the
    /config‘ directory of the Ampache installation.
  • Lastly, you will be asked to create a user for Ampache itself.
  • After logging into Ampache, go to the admin menu (found in the left menu) and add a catalog. This catalog should point to your music collection on the NAS.
  • Open a port in your router and forward it to the web server on the QNap (port 80 if it was not changed).
  • You are now ready to test your Ampache installation. You can go directly to the Ampache URL or if you have an iPhone you can use the free iAmpache app. One caveat with using the iAmpache app is, that it cannot play FLAC files. If you need to do this, or just want to save some bandwidth, continue with the following steps, which sets up FLAC to MP3 transcoding.
  • You will need LAME and FLAC in order to transcode the FLAC files to mp3.
    Install them as follows:
    ipkg install lame
    ipkg install flac
  • Open ampache.cfg in an editor able to display unix line ending (e.g. Notepad++) and edit the ‘transcode_cmd_flac‘ directive,
    so it looks like the following:

    transcode_cmd_flac = "/opt/bin/flac -dc %FILE% | /opt/bin/lame -rb %SAMPLE% -S - - "

  • Set ‘transcode_flac’ to ‘true’:

    transcode_flac = true
    Done!

  • Non-ASCII chars in Java

    If you are having problems with non-ASCII characters (for example the Danish æ, ø and å) not showing up correctly in your Java application, try giving the Java VM the following argument:

    -Dfile.encoding=UTF-8

    You can verify that the charset has been set with this statement:

    Charset.defaultCharset();

    Gigabit LAN vs. 100 Mbps Lan

    Having recently upgraded my home network to Gigabit speeds, I still had my old devices and cables around. Most of these were specced at 100Mbps, so now I had the perfect opportunity to do a head to head benchmark showing if the upgrade was worth the effort. I expected a significant performance improvement by replacing the old 100 Mbps router from my ISP, which acted as the hub for every wired and wireless device on my network, with a brand new Gigabit switch. As benchmark, I transferred a 2.3 GB file from my PC to a QNap TS-239 NAS 3 times over the router and switch respectively.
    These are the average speeds.

    .
    Name Speed in MB/s Total Tx Time
    NetGear VVG2000 Router 10.9 3:37
    TrendNet TEG-S80G 51,9 0:44
    .

    A significant improvement: The transfer is almost 5 times as fast over the Gigabit switch. The measured transfer speed through the NetGear router corresponds well with its specified maximum of 100 Mbps (~12MB/s). With the Gigabit switch, the harddisks of the PC and NAS  become the bottlenecks, since we are nowhere near the theoretical maximum of  a Gigabit network (120 MB/s).

    As a part of the upgrade, I also bought new Cat-6 cables. The oldest cable I still had in use was a Cat-5 and crimbed together by myself about 10 years ago. Since Cat-5 is generally not recommended for Gigabit networks, I thought it would be interesting to see just how much using these old cables would affect transfer speed.

    .
    Cable Speed in MB/s Total Tx Time
    Cat-6, 7m, Round 51.4 45.8
    Cat-6, 10 m, UltraFlat 51.9 45.4
    Cat-5, 5 m, round 51.5 45.7
    .

    To my surprise, the old Cat-5 cable was on par with the new Cat-6 cables! Luckily, there was not much of the Cat-5 cable to replace, so I won’t be beating myself up over making a useless investment…

    I also tested some “UltraFlat” Cat-6 cable, which I was worried would be susceptible to crosstalk, but as the table clearly shows, the performance of the “UltraFlat” cables are equal to that of the regular, round ones.

    So, the morale of story is: Don’t be affraid to use UltraFlat cables in your Gigabit network and if you have some old Cat-5 cable buried under your floor or in the wall: Test it with some Gigabit devices before going out of your way to replace it.

    TS-239 Pro II Turbo NAS

    This page details my QNap NAS setup and is primarily a reminder to myself of how to install and configure the applications running on it.

    Applications installed through QPKG

    Applications installed through IPKG

    Web Applications

    Applications on the PC

    iPhone

    Not installed anymore

    Local links

    Misc. Setup

    Coming up

    Slow access to shared network folder from VM

    After changing the network adapter type on a VMware virtual machine from NAT to bridged, the transfer speed from shared network folders dropped to about 25 kb/s and browsing shared folders was really sluggish. The network folder was located on the host machine, which was running Windows 7 Searching the VMware knowledge base resulted in the following article. I can confirm that the proposed solution also applies to Windows 7:

    Performance issues with bridged networking on Windows Server 2003 and Windows 2008 host operating systems

    In short: Use regedit to navigate to the following place:

    HKEY_LOCAL_MACHINE\SYSTEM\CurrentControlSet\Services\Tcpip\Parameters
    

    Then create a DWORD key named DisableTaskOffload and give it ‘1’ as value. TCP task offloading means distributing calculations concerning the network communication to the network card, so creating this registry key means that all these calculations will be done on the CPU.
    Microsoft Virtual Server seems to be susceptible to the same problem and offers the same solution along with two others: Slow performance when you try to access resources on your Virtual Server 2005 host computer from a guest virtual machine

    Using the hReview-Aggregate format in PHP

    Google is starting to support a number of microformats such as vCard and hReview. Google uses the term Rich Snippet for microformats.
    This article shows by example how to use the hReview-aggregate format, which is ideal for sites dealing with ratings and reviews. Some well known examples of sites already incorporating the hReview format are Imdb, Rotten Tomatoes and Cnet.

    As an example of how to use the hReview-aggregate format, we use a community driven site concerned with reviews of auto repair shops. On this site, each auto repair shop has a main page with its contact information and reviews written by users of the site.
    On each page we wish to put a hReview markup, so that search engines and other software agents can parse the name of the shop being reviewed, its average rating and the number of user reviews.

    The following PHP function writes a hreview-aggregate snippet based on a name of the auto repair shop and an array of reviews submitted by users.
    It first loops through the reviews in order to obtain an average rating (one decimal place) and then the actual snippet is echoed in the RDFa format.

    function create_hreview_aggregate($auto_repair_shop_name, $reviews)
    {
    	$average_rating = 0.0;
    	$number_of_reviews = count($reviews);	
    	
    	if($number_of_reviews > 0) {			
    		foreach ($reviews as $r)
    		{	
    			$average_rating += intval($r->rating);			
    		}		
    		$average_rating = number_format($average_rating / $number_of_reviews, 1);
    	}
    echo <<<EOT
    <div style="display: none;" xmlns:v="http://rdf.data-vocabulary.org/#" typeof="v:Review-aggregate">
       <span property="v:itemreviewed">$auto_repair_shop_name</span>
       <span rel="v:rating">
          <span typeof="v:Rating">
          Rating:
             <span property="v:average">$average_rating</span>
             /
             <span property="v:best">5</span>
          </span>
       </span>  
       <span property="v:votes">$number_of_reviews</span> 
       <span property="v:count">$number_of_reviews</span>
    </div>
    EOT;	
    }
    

    This code is placed on the main page for each auto repair shop in the database. If the page comes up in a Google search result, the name of the repair shop and the average rating will perhaps sometime appear just like movies on Imdb do today

    Googles presentation of Pulp Fiction on Imdb

    Chances are that the snippet is just summarizing what is already visible to the human eye on the page. To avoid this redundancy, it is perfectly legal to hide the snippet.
    This is what I have done in the example above by giving the div surrounding the snippet a “display: none” style.

    Rich Snippets Testing Tool

    At the moment, Google only supports Rich Snippets in its search results from a handfuld of major sites such as Imdb, Rotten Tomatoes and Cnet. If you are curious to see how Google interprets the semantic data on your site, you can use the Rich Snippets Testing Tool.
    This is how the hReview-aggregate produced by the code above is interpreted by the tool:

    How Google interprets the rich snippet from our example

    This tool also helps you in ensuring that your markup is syntactically correct. There is not much point in having semantic data on your page if it isn’t parsable by a machine after all :).
    Another useful, non-Google tool for this purpose is Optimus.